Thursday, July 29, 2010

Wrought iron


Wrought iron furniture and accessories have always attracted me. I am drawn to older pieces with character. Thought I'd share a few with you!
 
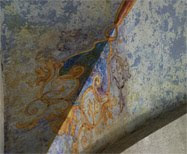
This lantern hangs on a corner building in Siena, Italy. At the opposite corner, there are three gorgeous, frescoed, groin ceilings from the late 1400's. I am preparing a post for next week on groin ceilings and will include them. 

I am not usually charmed by snakes (!), but they do add to this fixture. Love the grapevines. 


What a great door to one's bath! 


unknown source


The wrought iron scroll work against the brick is masterful and was created by the Belgian wrought iron craftsman, Prosper Schrijvers, in Brussels. How perfect with the blooming wisteria!


We found the next two items at antique shows. This rose wrought iron urn is one of a pair. 


This wrought iron stand holds whatever I pick from my garden!


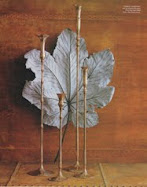
Last, but not least, are my two elephant ear plants. They are a member of the Caladium family and look like they'll take over the whole garden soon! They are as tall as I am.


Thank you, Cindy, at My Romantic Home, for Show & Tell Friday.
Thank you, Jessica, at A Few of My Favorite Things, for Favorite Things Friday.


Tuesday, July 27, 2010

Glossy white cubbies


Mission accomplished! I spent the last two weeks painting 36 white cubbies gloss white. Two primer coats, two white paint coats and one topcoat to protect. With the heat and humidity, drying time was an issue. Painting a large expanse of wall seems like a breeze.


The 6' x 16" cubbies will be used as a bar backdrop shelving unit for an upcoming tent party. They will hold stacked glasses and bottles of liquor, as in the last photo. The fun thing is that they can be used in any configuration. I can just see a few in my studio or kids' bedrooms or laundry room. Hmmm....


The cubbies are backed with an acrylic sheet that has a swirly white paint finish; with lights behind it, the pattern really glows. Of course, they can be used with a solid back or no back at all.

  
My hubbie's studio- definitely a working studio! Getting ready for a few big gigs.


Pretend-a-light (sunshine) to be replaced with light fixtures on location!


Here is Ikea's version:


I thought this was a great way to use them in the kitchen / dining room!

Sunday, July 25, 2010

Shimmery silver

A shimmery silver finish looks cool and refreshing on these hot, humid days! There are three main ways to achieve it.

This is a fab silver foil finish done by a Chicago decorative artist. The basecoat color is a silver metallic paint which does not need to have 100% coverage. You ask why not just the metallic paint? The foil adds depth that is just not obtainable with paint only. It is preferable to apply foils onto a similar colored basecoat to eliminate skipped areas from being so obvious.

Notice how the silver foil reflects colors in the room; here the lights are turned on and now it reads gold. The next photo is without the lights on and reads silver. 


This exquisite room was designed by Juan Montoya for the 2009 Kips Bay Showhouse. The decorative painter, Peter Tachkov, striaed Venetian plaster (no easy feat, believe me), followed by a sealer and silver metallic paint, the second option for a silver finish. The striae gracefully add to the metallic shimmer.


This unique mural (sorry- the picture is not in focus) uses silver metallic paint as the background and the trees are painted in a matte paint on top.


Here is a silver and black crackle finish from a decorative painter in Athens, Greece. The basecoat is a black paint, followed by the crackle size and then metallic paint.


The same finish was employed on this fireplace.


I truly admire this decorative painter's beautiful ceiling. He used silver (and gold) leaf, the third way to obtain the silver shimmer. Lots of careful measuring and calculations were certainly necessary. What a grand ceiling this is in the pool room!  


Thursday, July 22, 2010

A butterfly, a dragonfly and a Pieter B.


The past week has brought us a few lovely visitors to our garden. With the yard in full summer bloom, apparently we've been placed on the insect garden tour. Care to join us? 


Let me start out by telling you that we stopped using obnoxious chemicals five or six years ago, after we discovered that one of our dogs was slowly being poisoned. Once we stopped, he grew healthy again. Unfortunately for our neighbors, our "grass" consists of many kinds of grasses, some desirable and some not, as well as a variety of "weeds". Our outlook is if it's green, it can stay. 

That seems to have been an open invitation to many kinds of butterflies and birds. 

The butterfly bush (buddleia) is aptly named. Hang around it for a while and you'll see why. 


Here is the swallowtail butterfly.


 We caught the dragonfly busy at work.


The Pieter B. rose is a rose named after my special guy. When it was in the test phase, the rose grower asked him to use it and eventually to name it. He couldn't decide on a name, so we just called it the Pieter B. rose and the name stuck. It starts out as a unique color that I would have to say is caramel with rosy pink on the underside edges. It opens with a slight wave to the petals, which gradually lighten and grow until you have a pale cream rose that you would swear it could never have been any darker. These are in front of Pieter's studio; the bush's third round of flowers this summer.


This Oriental lily is an old-fashioned variety with its petals that "recurve" naturally- that is to say, they curve back instead of remaining fairly straight. 


The lilies received a special visitor who is challenging to photograph. Look closely. Do you see it?


Here is the hummingbird.


 Does anyone know what eats mosquitoes? I'd like to reduce that population!


Thank you, Cindy, at My Romantic Home, for Show & Tell Friday.
Thank you, Jessica, at A Few of My Favorite Things, for Favorite Things Friday.

Tuesday, July 20, 2010

Past Perfect


I was inspired by a comment made yesterday on my "Which would you prefer?" post, here, by Leigha Oaks, of the inspiring Elle Oh blog. Leigha favors "ridiculously rough walls" over a more refined look.

Here are a few different ways to feature the spirit of rough luxe.

This is an 18th century home in Saintonge, France. The warm, mottled off-whites of its worn plaster walls, along with the gorgeous stone floors, create its welcoming warmth and invite you to run your hands over their smooth surface. I love the door, too. 


Simply Contemporary by Henrietta Thompson  Photo by Solvi dos Santos


This Norwegian bedroom wall faces the sea. To protect the home from the extreme elements, the wall was covered with old sails (probably canvas) and then painted. The wonderful craquelure that developed would be very hard to duplicate with anything new.
 
Simply Contemporary by Henrietta Thompson  Photo by Solvi dos Santos


As this Italian home was renovated, the fresco was discovered and left in place. The whole setting is charming.


Italian Style by Jane Gordon-Clark  Photo by Simon Upton

These beautifully textured walls are part of an old warehouse building in Marseilles. The inhabitant, painter Francoise Martinelli, created the collage, which becomes the room's focus on the white-ish walls.


Simply Contemporary by Henrietta Thompson  Photo by Solvi dos Santos


In this bedroom, interior designer David Kaihoi and his wife, Monique Simard, found a tattered pile of hand-painted, 18th century Chinese wallpaper at an auction. They found three scenes, placed them on the walls and filled in the gaps with bits and pieces.

House Beautiful  Photo by Ngoc Minh Ngo


Breathtaking!
House Beautiful  Photo by Ngoc Minh Ngo

The natural, raw patina of the walls compliments the homeowner's hat display. I would like to see the curtains up close.

Elle Decoration UK  Photo by Jean-Francois Jaussaud

What is your take on raw walls? Do you like their natural patina or favor a more refined look?


Sunday, July 18, 2010

Gardenia pickin'


Gardenias love heat and humidity. 
With this summer's non-stop heat wave, they have been very happy. We harvested the blooms this afternoon to store for the wedding bouquets this week. Come on over and see!


This is the lineup of our tallest gardenia trees; they are about fourteen feet each. We have five trees that we over-winter in an unheated studio that never goes below 50 degrees- perfect for them to slow down their growth for four or five months.
They are hard to see here- look for the light gray trunks.


Again- these were hard to photograph, but you get the picture.


We have to stand on a ladder to reach the blooms. Fortunately, Pieter is 6'4", so his reach is much longer than mine! Pieter picks off the blooms and I transport them on a cookie sheet to the kitchen. Today, we harvested 71 blooms. To pick them, you snap the green base of the flower off of its stem. We pick almost fully open blooms and also those not quite open for boutonnieres. The less you touch the gardenia petals, the longer they will last and not turn brown.


They soak in the sink for fifteen minutes to be sure any little critters hiding in there are removed. Then we wrap them in wet paper towels and store them in plastic bags in the refrigerator and then the flower cooler at Pieter's studio.


I never tire of stepping outside and smelling their wonderful fragrance. 
Their waft of scent says summer!


Do you like the gardenia's scent? I suspect either you love it or you can't stand it; there does not seem to be much middle ground on this. I've never smelled a gardenia perfume that quite captured its true scent.