+web.jpg)

Until you can touch it, actually rub your hands on it and admire its creamy, firm smoothness, one cannot truly appreciate encaustic painting. Although encaustic painting has been traced back to the Greco-Roman mummy portraits near the Faiyum oasis in Egypt one thousand years ago, it is not a well known medium in modern times. Let's go investigate.
 Faiyum mummy portraits

The word encaustic originated from the Greek word, enkaustikos, which means "to burn in". The encaustic painting technique involves first creating the encaustic medium, applying it to a porous surface and then fusing it together with heat. The medium is a combination of wax and damar resin. Most often beeswax is used, but other waxes, such as carnauba, microcrystalline and paraffin, may be included. Beeswax is what we use, for its excellent light-reflecting quality and ability to combine well with pigments.

The beeswax combines with damar resin, a sap that is harvested from a tree found in Indonesia. It dries in crystals or lumps. Damar resin raises the melting point of the beeswax from 140 degrees to 160 degrees, allows the wax to cure and harden over time, resists dust and helps to add gloss and polish to the finished piece when buffed with a soft cloth. Each artist has a preferred recipe for the medium; we use 9 parts of beeswax to 2 parts of damar resin. Once the resin has completely dissolved in the beeswax, the mixture is filtered to eliminate unwanted particulates.
You can see how glossy and smooth the encaustic paintings become!


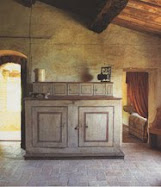
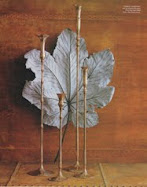
The wax mixture is applied to many types of surfaces, but each type must be both rigid and absorbent. Some examples are plywood, museum board, concrete, clay, Plexiglass, and even dried plant materials. Canvas, paper and fabric may be used, but must be backed by a firm board to prevent sagging.
Most of the examples here were created on birch plywood.
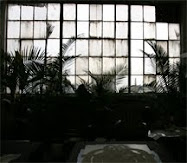
A key component of encaustic painting is proper ventilation. With the melting of the wax and resin, especially as the temperature of the wax rises, decomposition occurs and toxins are released. Adequate ventilation must be obtained to avoid untoward reactions, such as headache and nausea. Exposure to large concentrations of the toxins can lead to bronchitis and chemical pneumonia. In our home studio, there are windows on two sides of the room, so we open one window and have installed a powerful exhaust fan in the other window, directly above the work table to capture the fumes and send them outdoors.

Now comes the fun part! The studio has been assembled, with the exhaust system working, the encaustic medium melted and the birch plywood panel ready to go. The anodized aluminum palette we use has been specifically designed for encaustic painting by R and F Handmade Paints. We have also obtained our pigments from R and F to combine with the medium and give it the brilliant colors you see here. The pigments are in stick form and are a combination of linseed oil, beeswax, plant wax and pigment. Dry pigments may be used, but full safety precautions must be taken, as often they can be highly toxic. Oil paints may also be used, but the resulting encaustic paint can be less vibrant.
The panel should first be prepared by sizing it with the beeswax medium. The panel may also be sized with gesso or Venetian plaster. Most often, we use a natural bristle brush (no synthetics- they will melt) to apply the medium. After each layer is applied, it must be fused with a heat source. We employ a variety of sources: heat gun, propane torch and a small butane creme brulee torch. A household iron, heat lamp and even the sun may be used.
The pigment sticks are then melted, combined with the beeswax medium, and the artist layers and fuses away.

Texture is obtained by employing a wide variety of instruments: printmaking tools, dental tools, ceramics tools and whatever else the artist can think of to obtain the desired result. It's all part of the fun.


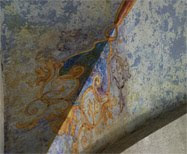
Many special effects may be obtained with encaustic painting. The wax medium is such a wonderful surface on which to create. The wax can be etched, scratched to reveal the underlying layer (sgraffito), inlaid (intarsia) with a different color, poured for a totally different effect, and the list goes on. Transfers and stencils can also be put to use. Many of these effects can be seen in all of the examples here.


Gold leaf has been added as the last layer in these examples.
Once the painting has cooled, it can be buffed with a smooth, clean cloth. It is fully cured after at least four weeks. If it loses its luster, the shine can be brought back by buffing again. Our preferred method is to simply buff with the pad of our hand, directly below the thumb.
All of the above paintings were created by Pieter Bouterse and myself.
Here are a few more examples created by artist Carolyn Holman.


There are many wonderful resources available on the internet. Several excellent books are also a gold mine of information. If you would like more details, please email me.


Dear Ann, fantastic article, beautiful work you are producing in your studio. Thanks for sharing the process in detail.
ReplyDeleteI have a friend, Jeff League, who gave me a tour of his studio and I saw the encaustic process first hand. Gorgeous -- I look forward to seeing each of his pieces and you're right: seeing them in person, the wax, just adds to the complete effect. Loved your post and the artwork you and Pieter put together was just a pleasure to read about and experience. Thank you!
ReplyDeleteYou are so talented. You continue to amaze me. do you do any teaching? My sister has a knack but would love to go to a class or spend some time with someone to learn more techniques that we could use in our business. Do you have any suggestions? Mona
ReplyDelete