+web.jpg)
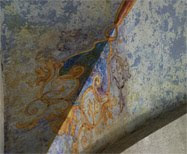
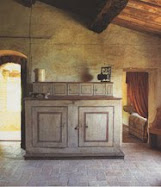
If you want to see a Venetian plaster finish done with an excellent technique, here it is. Notice the lack of obvious trowel marks, the beautiful stencil and the tiny star repeated throughout. The plaster was applied by decorative painter Judy Mulligan, working with the talented NYC designer, Marshall Watson.

Photo by Keith Scott Morton
The Prussian green Venetian plaster, an Italian synthetic plaster containing ground marble dust, was hand-troweled. The small stars throughout and custom, ivory paisley stencil were inspired by the work of the German architect, Karl Freidrich Schinkel. The final coat was a tinted, natural beeswax that was burnished to a marvelous sheen. Not only does this add a protective coat, but it also adds a great depth and patina to the finish.

Photo by Keith Scott Morton
A slightly better view of the custom stencil.

Photo by Keith Scott Morton
Would you consider a Venetian plaster finish for your home?


I certainly would. The beeswax buffed to a sheen! Subtle and gorgeous. Merci. Trish
ReplyDeleteBeautiful Venetian Plaster applied by an expert. The color is especially stunning.
ReplyDeleteI have used red Venetian Plaster, then burnished with tinted shoe polish and then stenciled with finger gold.
Off white Venetian plaster applied to columns and then faux painted makes for a very convincing marble architectural element.
I have this article in my files! Love it! YES to venetian plaster.
ReplyDeleteTheresa
Gina-
ReplyDeleteYou've got me there!
Burnish with tinted shoe polish? What was it like?
And what is finger gold?
Do tell!
Theresa-
The article finally got to me! I have looked at it for a year and a half and finally decided to see if I was the only one out there who likes teal plaster!
I love plaster and if my walls could look like that room I'd go for it! Beautiful images and excellent work!
ReplyDeleteHello Ann, I applied dark brown shoe polish with fine steel wool, let it dry and burnished to a high gloss. I wanted to achieve a rich red color, reminiscent of an Italian Renaissance red. The shoe polish probably wouldn't be practical for a very large area but is easier to work with than tinted bees wax.
ReplyDeleteFinger gold comes in little metal tubes. Also known as "rub and buff" available in craft stores. It is mostly used to repair gilded frames. You rub it on with your finger, let dry and then polish. I work the gold cream into the stencil brush on a glass pane and then stencil as usual. You have to work the gold cream well into the brush so that you don't have tell tale stencil "edges" .
Aaahhh- the Rub & Buff. I just never heard it called finger gold.
ReplyDeleteI'll have to try that shoe polish!
Thanks, Gina!